PrometheusWiki Gold Leaf Protocol: gas exchange using LI-COR 6400
John R. Evans A C and Louis S. Santiago BA Building 134, Research School of Biology, The Australian National University, Acton, ACT 0200, Australia.
B 3113 Batchelor Hall, University of California, Riverside, CA 92521, USA.
C Corresponding author. Email: john.evans@anu.edu.au
Functional Plant Biology 41(3) 223-226 https://doi.org/10.1071/FP10900
Submitted: 29 June 2010 Accepted: 28 October 2013 Published: 11 February 2014
Journal Compilation © CSIRO Publishing 2014 Open Access CC BY-NC-ND
Abstract
This leaf gas exchange protocol enables light or CO2 response curves using a LI-COR LI-6400 portable photosynthesis system. The protocol originates in PrometheusWiki (http://prometheuswiki.publish.csiro.au/) where it has been tested and verified, and has received favourable user reviews. This reformatted and non-editable version is published as a Gold Leaf Protocol. For the most current version, including any user-commentary updates, readers may view the live version of the protocol at http://bit.ly/PWLicorGold.
Additional keywords: gas exchange, Li-Cor, photosynthesis, transpiration, leaf temperature, conductance.
Introduction
This protocol explains how to make basic measurements with the LI-COR 6400 gas exchange instrument. The fluxes of CO2 and water are measured on a portion of a leaf enclosed in a chamber where the CO2 concentration, humidity, leaf temperature and light are controlled. The instrument calculates the rates of CO2 assimilation and transpiration, stomatal conductance and the concentration of CO2 in the intercellular airspaces within the leaf. Different leaves can be measured under a common ambient condition and responses to varying light or CO2 can be determined to reveal information about the underlying biochemistry.
Units and abbreviations
Photo – photosynthetic rate, synonymous with CO2 assimilation rate (μmol CO2 m–2 s–1); A – net CO2 assimilation rate; Trmmol – transpiration rate (mmol H2O m–2 s–1); Drierite – desiccant; A/Ci curve – CO2 response curve; CO2 concentration (μmol CO2 mol–1 air); CO2 partial pressure (μbar or Pa); IRGA (infrared gas analyser); Irradiance (μmol photons m–2 s–1); Reference air – air entering the leaf chamber; Sample air – air inside the leaf chamber; Cond – stomatal conductance to H2O (mol H2O m–2 s–1); VpdL leaf to air vapour pressure difference (kPa); PAR (photosynthetically active radiation, 400–700 nm); Ci – intercellular CO2 concentration (μmol CO2 mol air–1).
Materials and methods
Materials and equipment
-
LI-COR 6400 with LED light source and CO2 mixer (Note: This protocol is designed for versions 5 and 6(XT))
-
CO2 cartridges
-
Drierite – a desiccant
-
Soda lime for CO2 scrub
-
Standard RS-232 cable – to download data from LI-COR 6400
-
LI-6400 software – to download data
-
LI-6400 Sim program – to recompute data
-
Tripod or field stand (optional, to mount clamp for reaching high leaves)
-
PLUS permanent marker, razor blade, ziplock bag and cooler bag, for calculating leaf area
-
LI-6020 battery charger
Operating the LI-6400
-
Put in batteries and attach sensor head to console (take care uncoiling the cable to prevent cable wind).
-
Unwind lid tension screw to tighten cuvette lid on sensor head.
-
Attach CO2 cartridge: check O-ring is present and in good condition. Place cartridge where it lines up with O-ring, then screw on gently until it feels like it meets, then one last hard and fast screw turn to break the seal on the cartridge, make sure it is all the way on.
-
Turn on (using on/off switch).
-
In main menu, go to configuration menu, go to light source control, go to pick source and select the appropriate setting, press enter and escape to main menu.
-
Go to new measurements, line 2 and select temperature control. Set block temperature to control at your standard temperature.
-
In main menu, go to calibration menu, go to zero flow meter, you will have to wait ~10 s and then after verifying that the voltage is close to zero (otherwise manually adjust) you can hit OK (F5).
-
(i) Humid conditions (where obtaining a valid H2O zero may be difficult without dry N2 gas). Make sure that there is fresh soda lime and drierite in the scrub columns. In the calibration menu, go to IRGA zeroing, make sure the CO2 scrub is all the way on and that the desiccant is all the way off (bypass). Stay in this mode for 20 min to allow IRGAs to warm up. Record old zero values. Hit auto CO2, but not auto H2O or auto all. The H2O should only be zeroed when running pure N2 gas through the system. Verify good zero CO2 values and record.
-
-
Dry conditions (replace used drierite in scrub column with fresh drierite). In the calibration menu, go to IRGA zeroing, turn the H2O scrub on fully. Stay in this mode for 20 min to allow IRGAs to warm up. Verify good zero values and record. Hit auto H2O and then turn the CO2 scrub all the way on and the desiccant all the way off (bypass). Wait for a good zero to be reached (2–5 min) then verify good zero values and record. Hit auto CO2, then exit calibration menu.
-
-
Go to new measurements menu. Disconnect leaf thermocouple and verify leaf temperature equals block temperature (row h). If not, adjust potentiometer underneath IRGA mounting bracket.
-
Go to menu (line) 1 and open the log file (F5), name the file (usually use date and species ID – which is first 2 letters of each part of the scientific name, and any other information, like leaf # or plant #, e.g. 011607SOFA1–1) also put a short note, e.g. SOFA1–1
-
Go to menu (line) 2 and set the CO2 mixer to reference 400 (menu > CO2 mixer > reference >400) and the lamp to a reasonable value (1500 μmol m–2 s–1for plants growing in sunlight, or 500 μmol m–2 s–1 for shade plants.) Decide on Temp (temperature) control – if using batteries, this consumes power and requires more frequent battery changeover.
-
View the CO2 trace (press ]) and verify that CO2 control has reached the set value. Match the IRGAs (line 1 F5). It is important to match the IRGAs every time CO2 or H2OR is changed.
-
Check reference water (H2OR) is acceptable. If too low, add up to 10 mL water to the CO2 scrub column (soda lime). Set flow rate if lower flow required.
-
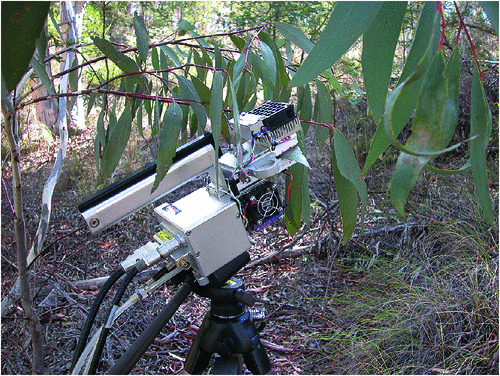
Place the chosen leaf in the cuvette (Fig. 1), make sure to cover as much of the cuvette with the leaf as possible. Make sure the leaf is in contact with the thermocouple.

Fig. 1. Measuring leaf gas exchange in Eucalyptus pauciflora using a LI-6400. Photography by M. Harrison.
-
Go to menu (line) 3 and enter leaf area estimate if it does not fully cover the opening. Enter STOMRT (1 for equal density on top and bottom, 0 for stomata on one side only).
-
Once the cuvette is closed, watch the parameters (Photo, Cond, Ci, Tmmol). Ensure that transpiration does not lead to excessive humidity. Note: generally humidity greater than 85% is excessive. If condensation occurs, the gas exchange calculations will be wrong until the system is dried out.
-
View the graphs (press ]) and when graph looks stable log the point using menu (line) 1, F1, or the button on the sensor head.
-
Light response curve or A-Ci curve. Go to menu 5, select AUTO PROG, pick type of curve, append to file (Y).
-
-
Light curve standard protocol: 1500, 1000, 500, 250, 120, 60, 40, 20, 10, 0), set min. wait time (usually 120 s), set max. wait time (usually 200 s), Y (yes) to match if change in CO2 gets less than 20, Y (yes) stability definition is OK.
-
CO2 response curve: (for C3 species) ambient, 50, 100, 150, 250, 350, 500, 700, 900, 1200, 700, 400. (for C4 species) ambient, 30, 50, 80, 110, 150, 250, 350, 500, 700, 400. set min. wait time (usually 120 s), set max. wait time (usually 200 s), Y (yes) to match if change in CO2 gets less than 200, Y (yes) stability definition is OK.
-
-
While the autoprograms are running, keep an eye on the following:
-
-
display line C, Photo (photosynthesis) should be between 0–15 or higher, respiration in darkness 0 to –2, Cond (conductance) should always be positive, between 0.01–1, Ci should be positive (a negative value indicates a problem with leaf temperature or water calibration).
-
display line D, VpdL, if greater than 2, then leaf is too hot, maybe too hot outside or too late in the day to continue (although OK for diurnals).
-
display line G, can check PAR in (light source) and PAR out (light level outside cuvette)
-
display line H, leaf temp should be slightly less than air temp
-
display line I, battery charge, when below 10 V it will beep to change battery.
-
-
Can see graph of readings, menu 4, view graphs, (for XT software, press ]), can scroll through but normally keep an eye on photosynthesis and conductance and check on stability, etc.
-
Can check on recorded points by going to menu 1, view file (F2), QuikPik Config (F1) (first time, afterwards can RePlot Graph), select light curve.
-
Also while light curve is running, there is time (it usually takes 20–30 min) to look for the next plant or do other measurements, such as leaf width, etc, just make sure battery level is OK or that you can hear the warning beeps if it becomes low.
-
When curve is finished, the star by menu 2 will be gone (a star indicates an auto-program is running), then check the graph of recorded points (see step 21), if the graph is OK and you are done with the leaf, then menu 1, close file (f3).
-
Now go to sensor head, while holding the leaf in place, open the cuvette and mark the leaf coverage of the cuvette, using a thin sharpie permanent marker.
-
Cut leaf off cleanly at stem, using a razor blade and put in a ziplock bag, keep the bag cool and out of direct light (in a cooler) until you can put in a leaf area meter.
-
If another leaf is being measured, go back to 10, otherwise put the instrument in sleep mode, download data or turn off.
Download data from the LI-6400 (for XT machines, data can be removed using flashcard)
-
Back in the laboratory, you can download the data stored in the LI-6400, but first you must install the LI-6400 software.
-
Take the LI-6400 out of the case and put in the batteries, you do not need to attach sensor head, it will say ‘Is IRGA attached?’, select No (N), and enter, it will go to the normal main menu.
-
Connect the LI-6400 to the computer with a standard RS-232 cable.
-
Open the file exchange program on your computer.
-
On the LI-6400:
-
-
from sleep mode, go Home in the utility menu (F5), select communications and then select file exchange mode
-
if LI-COR off, turn on, go to utility menu and select file exchange menu
-
-
On the computer hit the connect button to connect the computer to the LI-6400.
-
Drag and drop files from LI-6400 to the desired folder on the computer.
-
Once all files have been transferred, hit the disconnect button, exit computer program, turn off LI-6400 (same way as when you are taking measurements), unplug the cable.
Recompute data (after you know leaf area) from the LI-6400
-
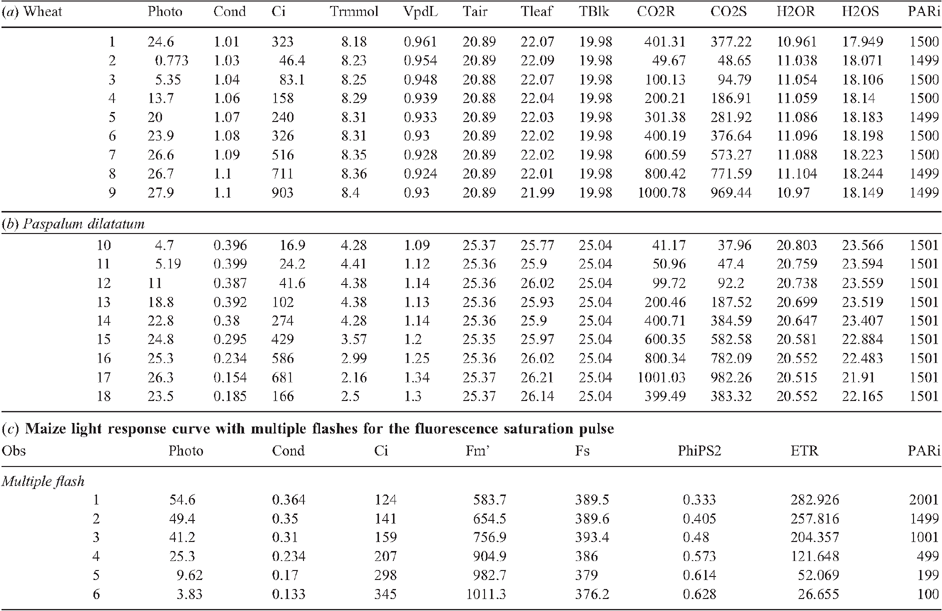
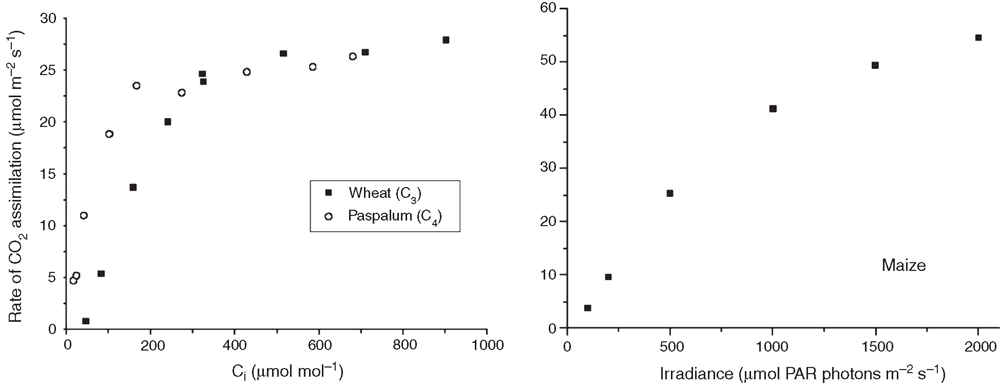
Open LI-6400 Sim program (this program acts as a simulator for the LI-6400, so open it and work in the same as you would on the real thing) (or recompute on the instrument before downloading). Note: version XT will provide results in an Excel file, meaning the LI-6400 Sim program is not essential. All formulae are already contained within the spreadsheet (for recomputing results based on leaf area etc). [See Appendix 1 for example data for CO2 response curves and a light response curve.]
-
Open the utility menu, choose recomputed data, Yes (Y) open window
-
On the file page, open the specific file, choose the data #1 tab and the data will be displayed in table form
-
In the column titled area, enter the correct leaf area (if less than 6, if 6 or greater then no need to recompute) down the column, then hit the recompute button (a triangle button that looks like a play button)
-
Save this file as the same name but with RCMP (recomputed) added
-
Open the next file and repeat until finished
-
Close out of program
Turning off the LI-6400
-
Turn off at switch
-
Loosen the cuvette lid to prevent gasket compression during storage
-
Remove the batteries and recharge
-
Fill in log book
-
Put everything away in the case.
Notes and troubleshooting tips for LI-6400
-
Synonyms: LI-COR 6400, LI-6400, 6400; protocol steps will differ slightly depending on software version being used.
-
Battery: When battery is low, the machine will beep slowly and then faster as you run out of time. Get fresh batteries, remove one old battery and replace it. Then do the other, being careful not to be too hasty or to hit the off switch, as this will stop the instrument and you will have to start all over again.
Links to resources and suppliers
LI-6400/LI-6400XT Instruction Manuals and Technical Notes LI-COR Biosciences sell a photosynthesis educational resource package that is a series of PowerPoint lectures covering both theory and practice for multiple measurement protocols. It includes guidelines on what environmental control settings to select and why as well as what is being measured and how. Part number is 6400–520. LI-COR Biosciences – Photosynthesis Educational Resource Package. A practical guide to using the LI-6400 is provided in the Supplementary Material, which is available online.
References
Farquhar GD, von Caemmerer S, Berry JA (1980) A biochemical model of photosynthetic CO2 assimilation in leaves of C3 species. Planta 149, 78–90.| A biochemical model of photosynthetic CO2 assimilation in leaves of C3 species.Crossref | GoogleScholarGoogle Scholar | 1:CAS:528:DyaL3cXksVWrt7w%3D&md5=b0753d90a732e686217d58be94f309baCAS | 24306196PubMed |
Ögren E, Evans JR (1993) Photosynthetic light response curves. 1. The influence of CO2 partial pressure and leaf inversion. Planta 189, 182–190.
| Photosynthetic light response curves. 1. The influence of CO2 partial pressure and leaf inversion.Crossref | GoogleScholarGoogle Scholar |
Sharkey TD, Bernacchi CJ, Farquhar GD, Singsaas EL (2007) Fitting photosynthetic carbon dioxide response curves for C-3 leaves. Plant, Cell & Environment 30, 1035–1040.
| Fitting photosynthetic carbon dioxide response curves for C-3 leaves.Crossref | GoogleScholarGoogle Scholar | 1:CAS:528:DC%2BD2sXhtVeiur3F&md5=a98955521cb2fe2211000f28ffa89a52CAS |
von Caemmerer S, Farquhar GD (1981) Some relationships between the biochemistry of photosynthesis and the gas exchange of leaves. Planta 153, 376–387.
| Some relationships between the biochemistry of photosynthesis and the gas exchange of leaves.Crossref | GoogleScholarGoogle Scholar | 1:CAS:528:DyaL38XjtFyjug%3D%3D&md5=39389476a6d71ce8dc462057334c948fCAS | 24276943PubMed |

|


